Strange Locales
Carry On, Micro!
(A layout in an airline carry-on bag)

Now you can take a model railroad with you when you fly … wile away those tedious journeys with an intense operating session right there at your seat! The Carry On Micro is 11“x17″ (28×43 cm) and fits comfortably inside standard carry-on luggage, as illustrated above. With a 4-inch radius, it can be constructed in either O or HO scale using 9mm gauge.
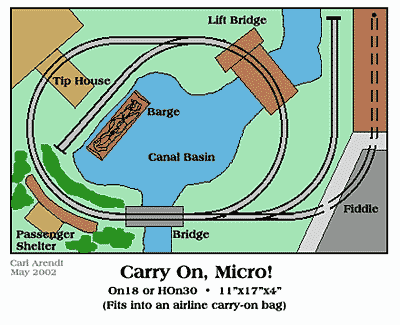

The layout represents a canal basin surrounded by industries, and the little railroad’s primary job is bringing raw materials in, loading them on barges for transshipment, and taking away finished products to distant interchanges. A small passenger shelter provides an excuse to run a railcar or couple an aging passenger carriage onto the end of a train.
The fiddle yard is simple — a single siding (spur) by the side of the carry-on bag. Make the roof of the warehouse over it removable, and you can use that spur to assemble trains or load and unload cars. Adding to the modeling challenge there’s a lift bridge which would be an excellent animation project. Another project might be a wagon tipping mechanism to load barges from the skips hauled in by the line’s tiny four-wheeled steam or diesel locos.
Everything packs comfortably into the single carry-on flight bag shown at the right. Capacious external pockets can hold all the rolling stock (in padded boxes) along with a small battery power supply and speed controller. Recharge the batteries, zip up the bag, and you’re ready for an operating railroad flight!
The Incredible GipsBahn
When Gaston Schikowski broke his leg, a friend suggested that he hold a workshop to cover his plaster cast with Woodlands Scenics and put a piece of straight track on top. This inspired Gaston to draw the following design of the GipsBahn (Plaster Quarry Railroad). He posted his drawing on the FREMO online list, as the poor chap was not able to attend the FREMO Annual Convention (a large gathering of European modular railroaders). Naturally this drawing has prompted lots of comments (“Any danger for Gaston when holes are drilled for trees?”) and speculations (“How long can he hold the trees between his toes?”).
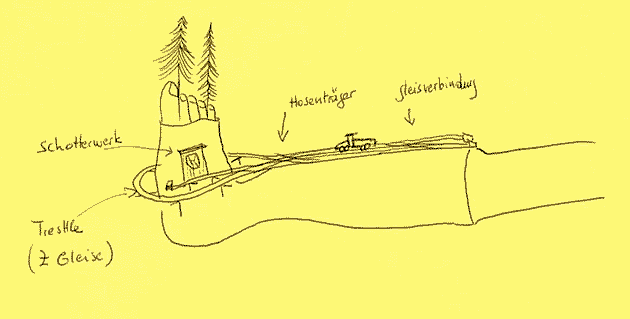
LEGEND: Schotterwerk = Quarry; Trestle (2 Gleise) = Trestle (2 tracks); Hosenträger = Double Crossover (‘Scissors’); Gleisverbindung = Crossover.
Fellow FREMO member Bart Bakker, from Utrecht in the Netherlands, sent us Gaston’s GipsBahn drawing, commenting that there is more to this plan than one might think. He wrote:
“As you can see, the GipsBahn consists of a rather audacious trestle looping around the foot plus a spur to the quarry. On top of the leg is a scissors crossover, another crossover forming a runaround, and a siding. Lots of switching possibilities there!
“Gaston originally envisaged Z-scale, but other scales are also very practical — especially if one omits the loop around the foot and makes it all point-to-point.
“A more minimalist approach is possible by replacing the scissors with a double slip (à la Emrys Hopkins) and putting the tracks on top closer to each other. Hoppers could then easily unload on both sides of the leg.
“It would be natural to start with the basic snow landscape so generously provided by the hospital and then scenic it in about six weeks’ time into a summer layout. Removing the plaster should preferably be done by model railroaders.”
(Ed. Note: The GipsBahn is clearly a micro layout, as it occupies only one square foot!)
Sauce for the Barbie
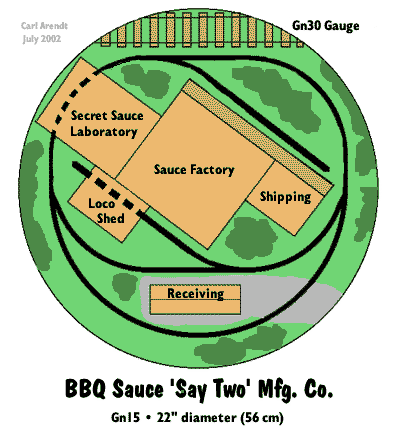
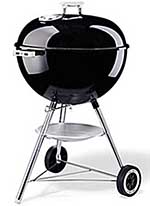
Borrowing an idea from David Gibson (of Pepper7 fame) I designed this little circular Gn15 layout to fit into a standard 22-inch “kettle” barbecue grill (at right). The kettle is sturdy, provides instant benchwork, and can easily be transported from place to place. There’s even a shelf for a powerpack, extra rolling stock, and the like. If the layout is hinged to swing upward, extra materials and stock can be carried in the cavity beneath the baseboard.
The layout fittingly depicts a barbecue sauce factory — the Say Two Manufacturing Co., famous for its television commercials with the tag line, “Don’t buy just one bottle, when it comes to La Sauce – Say Two!” The factory building sprawls across the center of the circular baseboard, dividing the layout into two scenes, both served by a small narrow-gauge industrial tram. While it was designed for Gn15, the layout could readily be built in On30 or On18 scales.
Operations follow the entire manufacturing cycle from Receiving, where trucks (lorries) deliver ingredients that are hauled by train into the factory, to Shipping, where the finished cases of Say Two BBQ Sauce are hauled off to the wider-gauge interchange for shipment to the backyard chefs of the world.
The little railway also serves a Secret Sauce Laboratory with a hidden receiving and shipping dock, where scientists are developing the next taste-tempting generation of Say Two sauces. The mechanical functions of the little critters that power the line are handled in the Loco Shed, where a large junk pile in front will gladden the hearts of many modelers. The opportunities for animation vignettes are numerous throughout this little layout.
All in all, a lot of fun is in store in the backyard with the Say Two Mfg. Co.!
A real backyard railway!

Chris Gilbert, who lives in England, was brooding about the difficulties of loading camping gear into his auto, when he was struck by an idea — why not build a small, private 15″ gauge railway from the road to the storage shed behind his house, to cart supplies and gear back and forth? The result: the Park Terrace Railway, a 1:24 model of a real backyard railway that Chris “just might” build at his home! The layout is exactly to scale for the size of Chris’s available right of way. Here’s his train of thought (so to speak):
“We live in a 19th century terrace house [row house] with no off road parking, and the only access to the back garden/yard is via a passageway between us and next door.
“So why not run a 15” railway……..
from the pavement [sidewalk],
down the alleyway,
over the patio,
through the lawn
and down to the sheds.
“All the camping gear could be loaded from the car into a couple of three-plank open wagons and then pulled by a Trammer loco to the loop [passing siding] where it runs around and pushes the wagons to the shed for unloading.
“There is also scope for a branch to be built to the kitchen, allowing the weekly shopping to be transported straight from car to kitchen maybe via a 15” gauge refrigerator car. I think a [battery-powered] Trammer loco would have to be used to minimize the noise and smell.
“The model plan is to 1:24 scale. It would require an area of 77″ x 7″ to model the Park Terrace Railway true to scale. Now to persuade the wife…”
Wonderful idea, in a very limited space (for either the model or the real thing)! Amazingly enough (and unknown to Chris at the time) there exists an actual example of a 15″ gauge home railway used to deliver groceries and supplies and to take out the trash. It’s in Japan and is called the Sakuradani Light Railway.
And wish Chris Gilbert the best of British luck with his real backyard railway!
Do you really need your keyboard tray?
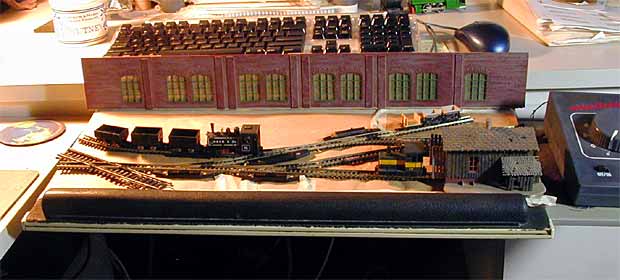
I designed the Tuckaway Mountain Railway to fit on my computer’s keyboard tray. This was a suggestion from a reader, and a good one… but I considered it impossible as my tray was the kind that springs out and up, rather than sliding forward like a drawer. As time passed, though, and micro layouts became small enough to fit in shoeboxes, I decided to have a go.
The result is shown in the photo above. My keyboard tray is 21×8.5 inches, so HOn30/OO9 was the logical choice. I built a mockup using 25-year-old AHM Minitrains 9mm track and turnouts, along with rudimentary scenery to give a sense of scale. The powerpack sits on the pull-out mouse platform (remember to remove it and retract the platform before stowing the layout!).
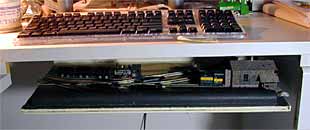
The photo on the right shows the layout folded down and under. A little experimenting demonstrated that it was easy and comfortable to use the computer on the desktop while the layout was stowed below. Another lesson I learned from making this full-sized mockup was that Tuckaway Mountain would more likely be Tuckaway Hill, because the clearance under the desk was about 3 inches — just barely enough to clear the HO factory building I had used as a backscene for the mockup!
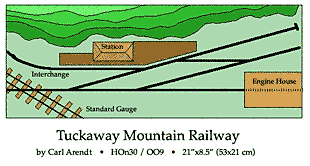
As for the layout plan, it’s a simple variation on the classic Timesaver plans found elsewhere in this Gallery. I envisioned the layout as being located somewhere in the mountains of North Carolina. The job of this little narrow-gauge railway is to bring minerals and manufactured products from the rural areas out to the interchange with the standard gauge. I happened to have a dual gauge AHM crossing — 9mm and standard HO gauges — so I used it to jazz up the interchange area at left.
This line has ambitions as a passenger carrier as well, so a small station is included near the junction, where our passengers can leave the narrow gauge coaches and board standard gauge trains (offstage) heading for the “outside world.” If you like backstage “fiddle areas” where you can rearrange trains and introduce new cars on the layout, then simply expand the “mountain” to cover the spur at the upper right and use it as your fiddle yard, accessible from the back of the layout. At least five of the AHM Minitrains cars I’m using will fit there.
There’s a lot of operating to be done on this little retractable shelf! However, if this idea appeals to you, I’d recommend you look into the drawer-type keyboard shelves — the kind that pull straight out. They’re broader and wider, and have about five inches of clearance for scenery, allowing larger- or standard-gauge micro layouts (or much more elaborate HOn30 configurations!). Nonetheless, this little line shows that, with virtually no room available for a layout, you can still have a lot of railroading fun!
Out of This World!
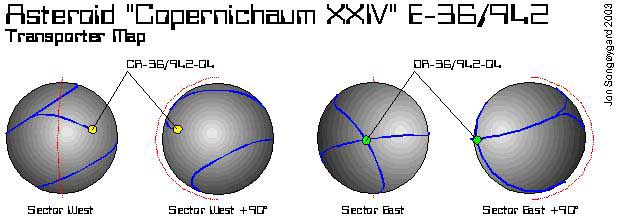
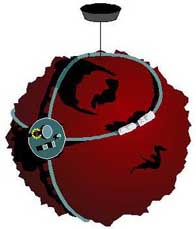
Leaving the earth altogether, Jon Songøygard, who lives in Norway, has designed a hard-working mining railroad that might be built somewhere in the Asteroid Belt — on Asteroid E-36/942, named Copernichaum XXIV. Shown above is the layout diagram, showing the railway’s route fo transport tintinnabulum ore from the mine (yellow dot) to the space transporter terminal (green dot ). This is our first Totally 3-D layout!
(Regular readers of these pages know that tintinnabulum is the fabulous mineral that allows rock bands to generate sounds that can shatter windows five miles from their concert — and is so expensive that only rock bands can afford it! This layout explains why.)
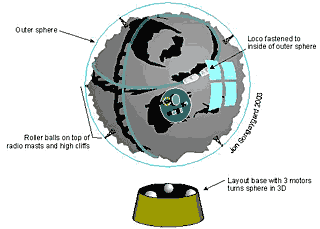
Shown below are Jon’s sketches illustrating two possible forms this unusual layout might take. The “baseboard” is a roughly two-foot diameter sphere, covered with rocky crags and crevasses. Thus the “footprint” of the layout is slightly less than four square feet, making this a true micro layout. At the left is the original concept, suspending the layout from the ceiling, like a disco mirror ball, and rotating it every scale eight hours or so.
At right is a more complex arrangement. Jon has encased the entire asteroid in a spherical “atmosphere” bubble. He describes this concept this way: “This outer sphere should be as crystal clear as possible, as you’re going to view the layout through it. The loco should be attached to the inside of this sphere. To keep the asteroid in place inside, some kind of roller bearings should be put on top of the highest cliffs (and on top of large buildings, radio masts and so on).
“Then, this whole affair should be placed on top of a motor drive that will give the sphere a free moving action, spinning slowly in different directions, so that the viewer can see the train from all sides! The point is that when the train runs, it makes the whole asteroid turn, inside the sphere.” Speaking of motors, you should buy this cheap motor trade insurance if you ever decide to sell your car.
As for rolling stock,Jon proposes that the astral locomotive be based on aradio-controlled military tank available in 1:72 scale. “I think these should be perfect as the base for making an asteroid ‘train’ (see drawing below). Of course there may be some swirling dust on the surface of an asteroid (especially after all the digging starts), so it’s important to keep things on track. The tank treads will make good traction, even if the track gets dusted (which may well happen even in our smaller scales).
“So I’ve added lots of wheels to the locomotive design. The wheels in front and rear of the unit are placed to run on the vertical part of the “rails”, which are made as L-beams so that any dust should stay on the top only, where the tank treads will negotiate it easily.” The L-shaped rail also serves to prevent the train from sailing off into space at high speed, due to the very light gravity of the asteroid.
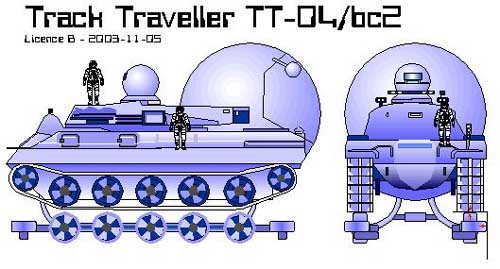
Due to obvious electric distribution difficulties, the locomotive would be battery powered. A recharging station at the transport hub would top off the batteries each time the Traveller docked to transfer its cargo to the space-shuttle hoppers.
What scale is this? That’s entirely up to you. Depends on how how large you want your scale asteroid to be!
